
Changelog
Release date scheduled on end of every month.
Tingkatkan Penglibatan Pelanggan Dengan Works25 Hybrid Chatbot: Gabungan Sempurna AI & Sentuhan Manusia
Dalam dunia perniagaan yang pantas hari ini, kelajuan maklum balas adalah kunci kepada kejayaan jualan. Works25 membawakan Hybrid Chatbot, satu inovasi yang direka khas untuk memastikan perniagaan anda sentiasa responsif tanpa memerlukan tenaga kerja yang ramai sepanjang masa.
Ciri-Ciri Utama Hybrid Chatbot Works25:
1. Sambutan & Sokongan AI Automatik AI kami bukan sekadar bot biasa. Ia mampu menjawab soalan secara bebas dan mencadangkan item atau perkhidmatan yang relevan kepada pelawat di minisite dan borang tempahan anda. Ini memastikan pelanggan mendapat maklumat yang mereka perlukan serta-merta.
2. Pemantauan Langsung & Pengambilalihan Manusia Teknologi tidak seharusnya menggantikan manusia sepenuhnya. Apabila pelanggan memerlukan bantuan yang lebih mendalam, kakitangan anda akan menerima notifikasi segera. Mereka boleh “Claim” perbualan tersebut untuk memberikan nasihat pakar yang diperibadikan.
3. Transisi WhatsApp Yang Lancar Kami memahami kepentingan WhatsApp dalam pasaran tempatan. Kakitangan anda boleh menghantar butang interaktif untuk memindahkan perbualan dari laman web terus ke aplikasi WhatsApp secara instan, membolehkan hubungan jangka panjang dengan pelanggan dibina dengan lebih mudah.
4. Auto-Resume 30 Saat Konsistensi adalah keutamaan kami. Jika kakitangan anda tidak aktif atau sibuk, sistem AI akan menyambung semula tugas melayan pelanggan secara automatik selepas 30 saat. Ini menjamin tiada pelanggan yang dibiarkan tanpa jawapan.
Kesimpulan
Works25 terus komited dalam menyediakan penyelesaian automasi dan sistem yang membantu usahawan PKS di Malaysia untuk berkembang. Dengan model harga berasaskan penggunaan (pay-as-you-go), sistem ini bukan sahaja efisien tetapi juga kos-efektif untuk perniagaan anda.
Seminar: AI dalam Works25
AI dalam Works25: Nak tahu macam mana ia bantu mudahkan kerja? 🚀

Ramai yang tanya macam mana AI boleh hantu urusan bisnes dalam sistem Works25. Jom sertai sesi sembang santai saya malam Jumaat ini. Saya akan kongsi apa yang baru dalam ekosistem Works25 khas untuk pemilik bisnes dobi dan retail.
📅 Jumaat, 1 Mei 🕘 9:00 Malam – 10:00 Malam 📍 Pautan: https://meet.google.com/aas-dpxp-bdq
Masuk adalah percuma. Kita belajar cara nak mudahkan operasi supaya urusan bisnes jadi lebih efisien.
AI In Works25
Works25 has evolved beyond a standard POS system into an intelligent business partner. By leveraging the power of Google Gemini, we’ve integrated advanced AI tools that eliminate manual data entry and simplify complex management tasks.
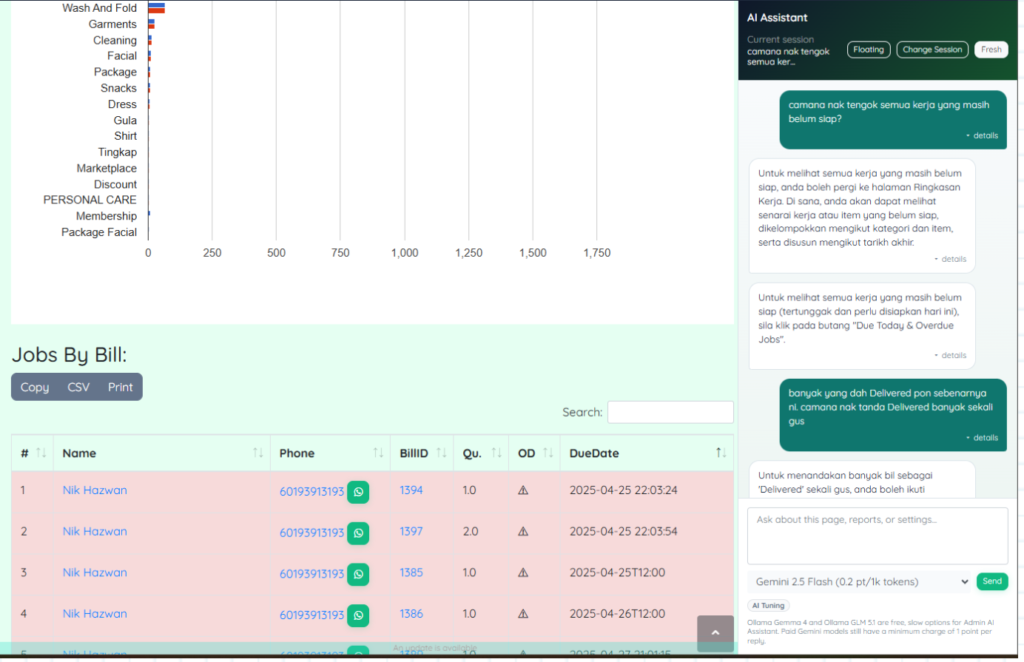
AI Assistant (Your Business Copilot)
The AI Assistant is a dockable panel available to administrators. It acts as a real-time consultant that understands the specific context of your business operations.
- Natural Language Commands: Instead of digging through menus, users can type “Mark order #1025 as Delivered” or “Show me the sales report for last Tuesday.”
- Context Awareness: The AI “sees” the current page the user is on, allowing it to provide instant help regarding specific orders, inventory items, or customer profiles without needing background explanation.
- Administrative Actions: It can update ready-by dates, assign staff to specific tasks, and even block or unblock customer profiles based on credit limits.
- Custom Tuning: Admins can provide “tuning text” to the AI, effectively creating a custom internal knowledge base that the assistant uses to guide staff according to company-specific SOPs.
AI Smart Scan (Accounting & Procurement)
The AI Smart Scan feature uses Gemini Vision to automate the tedious process of manual bookkeeping for supplier bills and expenses.
- Instant Data Extraction: Users can simply snap a photo or upload a PDF of a supplier invoice. The AI automatically identifies the vendor, date, total amount, and tax details.
- Automatic Transaction Mapping: The system performs a “second pass” to map the items on the receipt to your existing Chart-of-Accounts, ensuring your accounting remains organized and accurate without manual selection.
- Queue Management: For businesses with high volume, the “uploaded_bills” feature allows staff to scan multiple documents at once and process them later from a centralized queue.
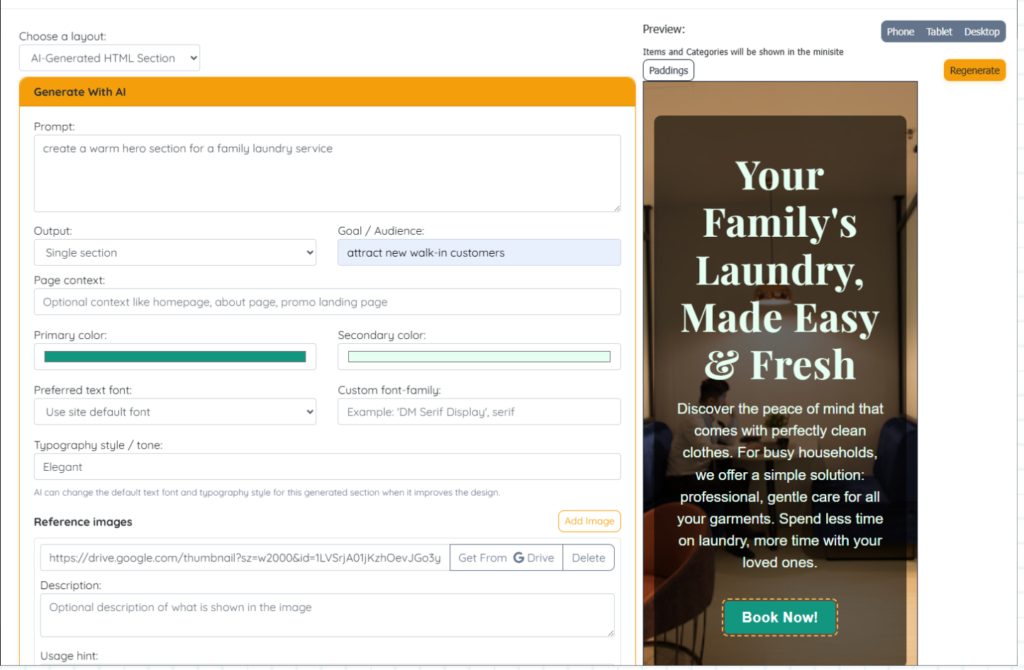
AI HTML Web Design Generator (For Price Lists & Marketing)
Creating professional-looking descriptions for new services or products is now automated with the AI HTML Generator.
- Smart Formatting: When adding a new item to the Price List and Mini-Site, users can describe the description in plain text. The AI then generates the corresponding HTML code to ensure the item looks professional on the Customer Mini-Site and digital bills.
- Rich Descriptions: It can automatically highlight key selling points—such as “Stain Removal Included” or “48-Hour Turnaround”—using clean, responsive layouts that work perfectly on mobile devices.
- Consistency: This tool ensures that even staff with no technical knowledge can maintain a high-quality, consistent look across the entire digital storefront.
Why Use These Features?
- Efficiency: Reduce time spent on manual data entry by up to 80%.
- Accuracy: Minimize human error in accounting and order management.
- Accessibility: Staff can operate complex system functions using simple conversation.
- Incentives: To help users get started, the system offers AI Points nudges for returning users, ensuring they can test these tools without immediate overhead.
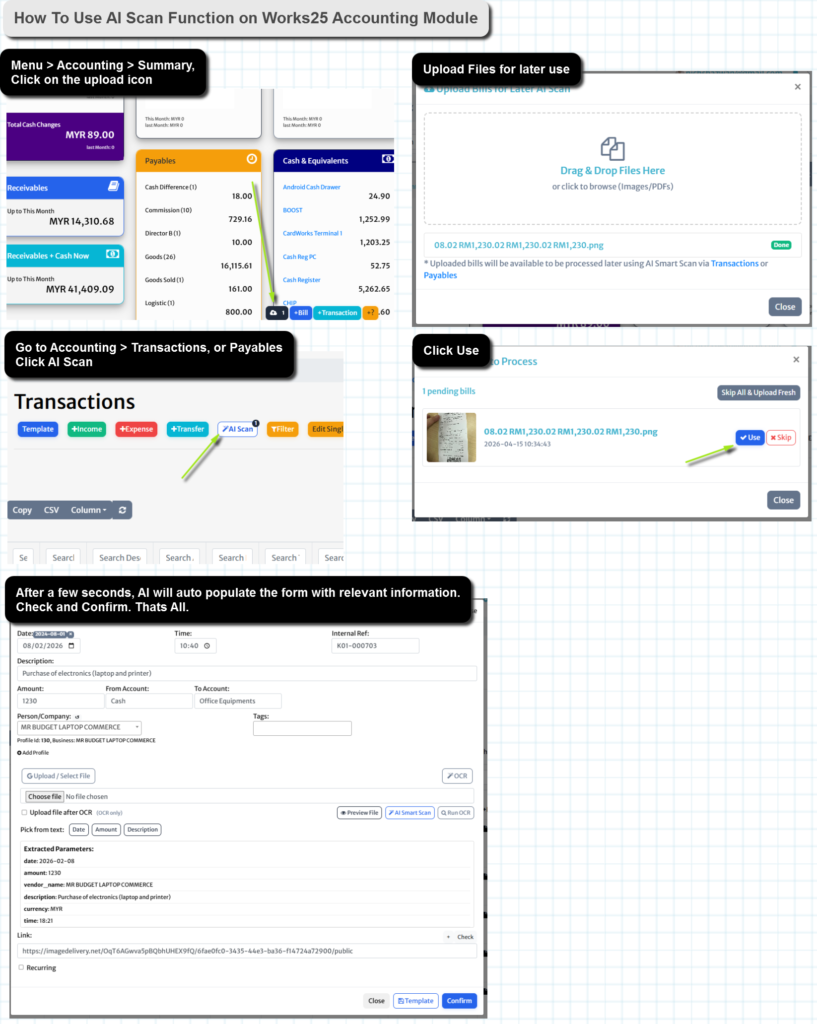
Say Goodbye to Manual Expense Entry!
Tired of staring at a mountain of receipts at the end of the month? We just made your accounting a whole lot faster.
Introducing the AI Scan Function on the Works25 Accounting Module! Now, you can turn a physical receipt into a digital record in seconds. No more typing, no more typos.
How it works:
- Upload: Drop your receipt images or PDFs into the system.
- AI Scan: Click the “AI Scan” button in your Transactions or Payables tab.
- Confirm: Watch as the AI automatically populates the date, amount, vendor, and description. Just check and click Confirm!
Spend less time on paperwork and more time growing your business. 📈
Check out the tutorial image below to get started!
API & Webhooks
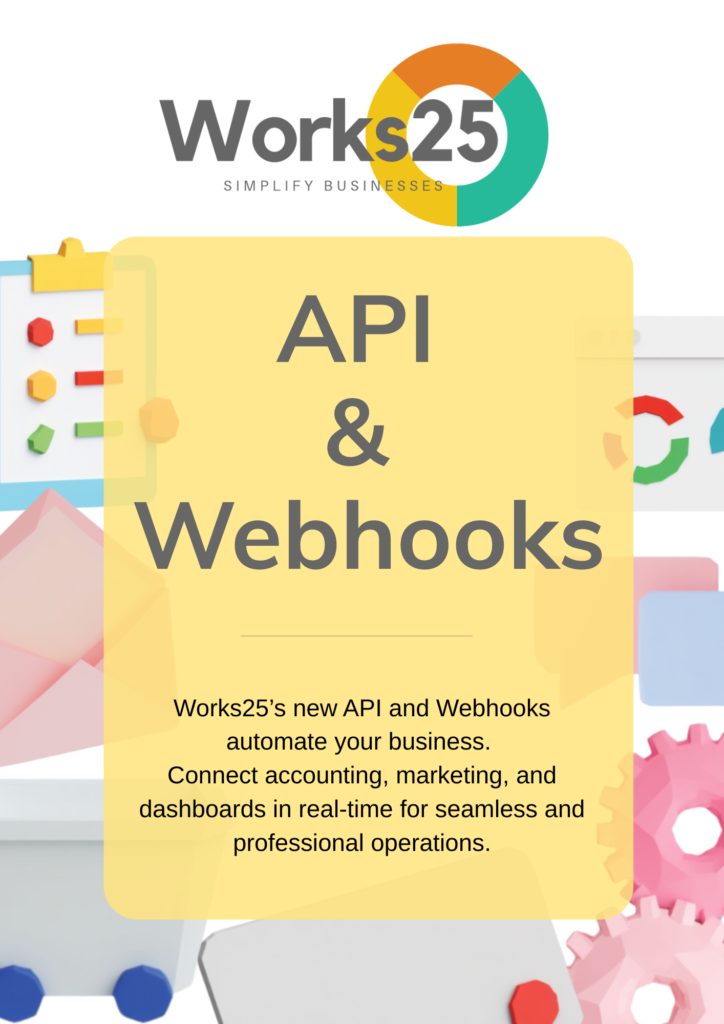
Unlocking the Power of Real-Time Business: The Works25 Automation Revolution
In the fast-paced world of retail, laundry, and F&B, speed isn’t just an advantage—it’s a requirement. As business owners, we often find ourselves stuck between different tools: a POS for sales, a separate app for accounting, and another for marketing.
Today, Works25 is bridging that gap. We are excited to announce the rollout of our Core Webhook Engine and API Integration, designed to turn your POS into a high-speed command center that talks to all your other business tools in real-time.
What is a Webhook? (And Why Your Business Needs One)
Think of a Webhook as a digital messenger. In the past, if you wanted to know if a payment was received, your accounting software would have to “ask” the POS every few minutes.
With our new Real-Time Automation Engine, the roles are reversed. The moment an event happens in Works25—like a new order being created or a payment landing via ToyyibPay or SenangPay—Works25 immediately “pushes” that information to your other apps. No waiting, no manual data entry, and zero lag.
Every Action Triggers Growth
We have integrated these triggers into every critical step of your daily operations. Your business can now react instantly to:
- Orders & Jobs: Automate notifications the second an order is edited or a job status changes.
- Payments: Whether it’s Chip, SenangPay, or a manual entry, your financial tools are updated the moment the money is recorded.
- Customer Growth: When a new customer registers via your public form, you can automatically add them to your email marketing list or loyalty program.
- Operational Proof: When a staff member uploads a photo of a completed job, that image can be sent directly to the client or archived in your cloud storage automatically.
Built for Industrial-Scale Reliability
We know that in business, “missing data” is not an option. That’s why we’ve built this engine with Industrial-Scale Reliability.
If your external server happens to be down, our system doesn’t just give up. It utilizes Exponential Backoff, meaning it will automatically retry the delivery up to 10 times at increasing intervals. Furthermore, our Concurrency Control ensures that even during your busiest hours, every notification is sent exactly once—no duplicates, no confusion.
Your Data, Your Way
Every business is unique, and your data should be too. Our new Flexible Data Mapping allows you to customize the exact structure of the information you send. Using a simple “pill-based” variable system, you can choose exactly what data points—like {{customer_name}} or {{total_amount}}—are sent to your endpoints.
Running multiple branches? You can set different webhooks for different locations, allowing for granular control over how each branch manages its data.
Future-Ready Security
Your data security is our priority. Our integration supports the highest industry standards, including HMAC SHA256 Signatures, ensuring that the data received by your external apps is verified and untampered with. Whether you use Bearer Tokens, API Keys, or legacy Basic Auth, Works25 is ready to shake hands securely with your tech stack.
Start Automating Today
The future of business is connected. By removing the manual “middle-man” tasks, you free up your team to focus on what matters most: serving your customers and scaling your brand.
Log in to your Works25 dashboard today and head to Settings > Integrations see how you can start connecting your favorite tools. It’s time to put your business on autopilot.
Works25: Smarter Systems. Faster Growth. Future Ready.
Update 2026-02-22
What’s New: Recent Updates & Features (Since Nov 2025)
We’ve been working hard over the past few months to bring you a faster, more reliable, and more powerful experience. Here’s a summary of the exciting new features and improvements now available to you and your team:
Lightning Fast
- Instant Catalog & Customer Loading: We’ve introduced a brand new “Local Cache” system. This means your customer lists, price catalogs, and active orders are now saved directly to your browser.
- The Benefit: Your system will now load incredibly fast! Even if your internet connection slows down, you can still seamlessly search for customers, browse your catalog, and manage orders without frustrating slow loading screens.
- Modules Upgraded: New Order, All Orders
Smoother Payments & E-Invoicing
- Enhanced POS Integration: We’ve heavily upgraded our integration with Finexus and CardWorks. You can now process non-blocking payments, meaning you won’t be locked out of the system while a payment processes.
- Instant Payment Inquiries & Refunds: Easily check the status of a payment directly from the system, and process full or partial refunds (with the ability to add refund reasons) seamlessly.
- Module Upgraded: Finexus Terminal Integration
Better Hardware Connectivity
- Plug-and-Play Thermal Printing: We’ve introduced Web Serial and WebUSB support! This means your thermal printers and cash drawers can now connect directly and more reliably to the system via Bluetooth or USB.
- No More Overlapping Prints: We’ve fixed the issue where multiple receipts printing at once could cause errors. The system now “queues” prints perfectly so your hardware never gets confused.
- Modules Upgraded: Receipts and Tags printing. Set Custom Printing in Settings > Device Settings > Printing Method, choose Custom
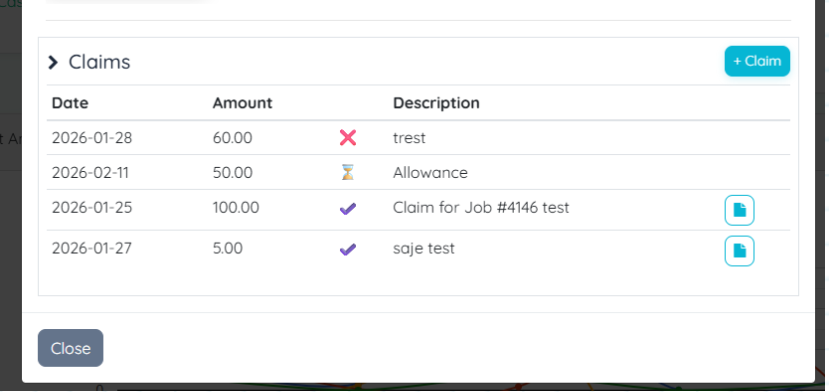
New Internal Claims & Expense Tracking
- Submit Claims Directly: Staff can now submit internal claims or expenses directly through the system.
- Fast Approvals: Managers get real-time notification badges on their dashboard and can instantly approve or reject claims. Approved claims are automatically logged as official business expenses without any manual double-entry.
- Instant Notifications: The system now sends immediate push notifications to both managers (when a new claim is submitted) and staff (when their claim is approved or rejected).
- Module Upgraded: Orders > Admin Tasks.
Powerful Financial Reporting
- Deep Cash Flow Insights: We’ve added comprehensive Cash Flow statements (Cash In & Cash Out reports). You can now trace exactly where money is moving, including pro-rated tracing between Payables and your bank accounts, giving you crystal-clear financial visibility.
- Combine Bills Safely: You can now combine multiple customer bills into one clean invoice. We’ve also added safety checks to prevent you from accidentally combining bills that have already been officially e-Invoiced.
- Module Added: Reports > Account Information > Cash Flow
Beautiful Tools & Customer Interactions
- Dynamic Web Pages & FAQ Tools: We’ve added new tools to build beautiful pages for your customers, including easy-to-use FAQ drop-downs, full-width image slideshows, and customized sections to make your storefront pop.
- Share Order Images Instantly: Keep your customers in the loop! You can now instantly share secure web links of their “Order Images” via WhatsApp or Email, automatically sending them a summary and a link to view their items.
- Rich Text Editing: When adding notes or comments to orders, you can now use bold, italics, colors, and lists to make your instructions clearer than ever.
- Modules Upgraded: All Orders, Stations, Jobs Summary, Mini-Site, Price List, Item Landing Page, Category Landing Page.
We hope these new tools help you save time and run your business even more efficiently!
Chrome blocks Local Network Access
Recent Google Chrome update (version 142) blocks access from on online web to the local network access. Some of our clients hardware setup might be using local network for printing and drawer kick. To enable the access again, follow through these steps:
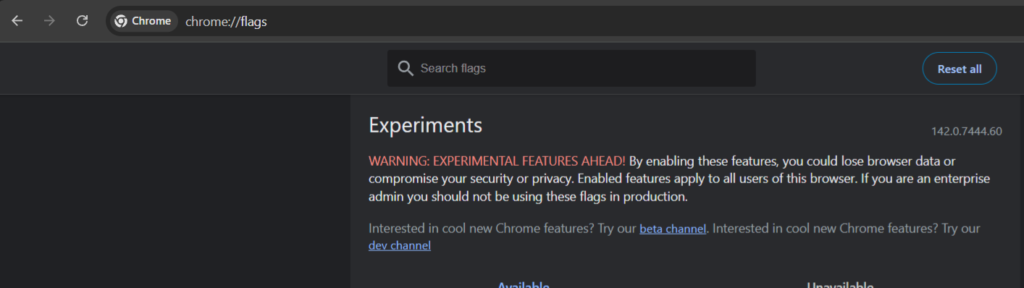
1. Open Google Chrome, and click on the address bar. Type in: chrome://flags and hit enter.
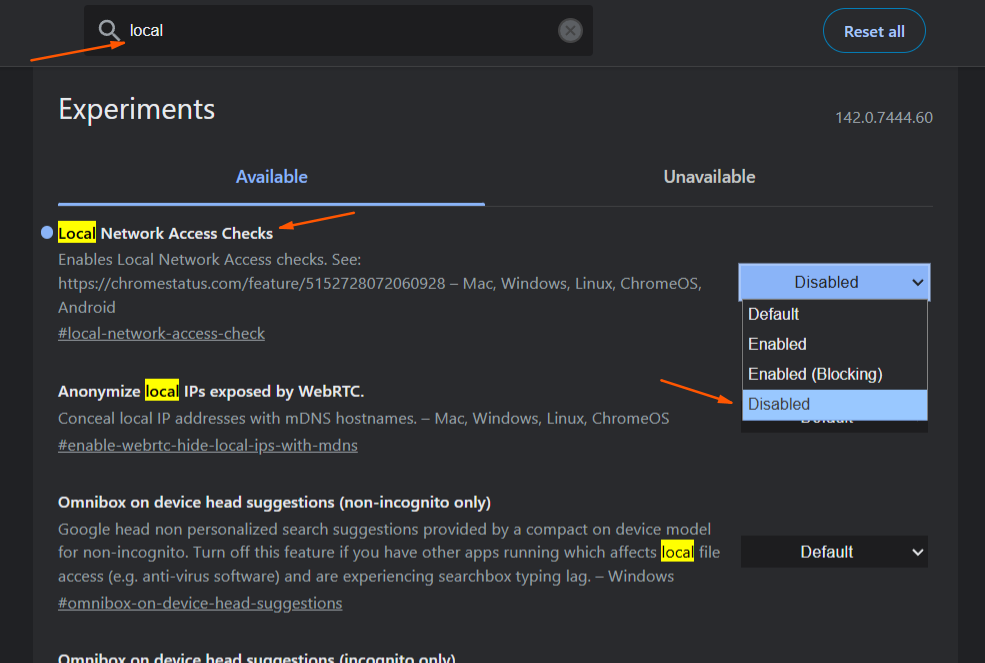
2. In the search box, type in: Local
3. On Local Network Access Checks, change from default to Disabled.
4. Restart Chrome and Works25 app. That is all.
Test opening Cash Drawer or Printing via local network to confirm.
Update 2025-10-18

🕒 Business Hours Setup
Easily define your operating schedule to better control pickup and ready-by times.
-
Go to Settings → Company Information → Hours
-
Set opening and closing times for each day, and mark closed days or holidays
-
Click Save Business Hours
Once configured, all customer delivery checks and order time calculations will automatically respect your business hours.

📄 Duplicate Quotation
Create a new quotation in seconds based on an existing one.
-
Navigate to All Orders → Quotation
-
Click a quotation number to open its summary
-
Select Duplicate — a new quotation will be created
-
Click Convert To Order for further edits
Perfect for quotation templating.

✍️ Click-to-Sign for A4 Documents
Digitally sign your invoices, quotations, or delivery orders right inside Works25.
-
Go to All Orders, open the bill ID
-
Click the A4 document icon
-
If you created the order, a Click-to-Sign button appears
-
Sign and Save
Your saved signature will automatically appear in all printed and exported copies of the document.

📊 Daily / Monthly Collection Report (New)
View a detailed summary of your daily or monthly sales and payments.
-
Access via Daily / Monthly Collection Report button at the bottom of the Report page
-
Review total sales, cash register entries, and resolved/unresolved balances
-
Export in Copy, CSV, or PDF format
The report looks like the attached sample — giving a clear breakdown of daily collections and payment reconciliation.
Update 2025-09-30
Works25 Latest Update Highlights
🧾 PDF, Signatures & Receipts
-
Automatic Signature Display – If a signature is saved, it now appears automatically on the receipt PDF.
-
Cleaner PDF Layout – Extra space at the top of PDFs has been removed for a tighter, more professional look.
-
More Reliable Exports – The system now waits for all images and elements to fully load before generating the PDF, ensuring complete captures.
-
Improved Signature Handling (CORS-Safe) – All online signature images are now processed safely through Works25’s internal proxy for better compatibility.
-
Attendee Signatures (Creator Sign Flow) – The person who created the record can now sign directly on the document using the built-in “Click to Sign” feature.
💼 Quotations & Transactions
-
Duplicate Quotation Feature – You can now quickly copy an existing quotation and edit it to create a new one.
-
Internal Reference Display – Transaction Advice now shows the internal reference (InRef) for easier tracking and reconciliation.
-
Safer Transaction Editing – System now prevents risky edits to transaction dates or locked records, helping maintain accounting accuracy.
🖨️ Thermal Printing & Hardware
-
Bluetooth Thermal Printing Support – Connect directly to a Bluetooth printer from your POS device (requires HTTPS and browser permission).
-
Improved Print Reliability – Faster device discovery and more stable print jobs for smoother thermal printing.
🧑💻 UI/UX & Themes
-
Refreshed Interface – Cleaner navigation and profile pages for better user experience.
-
New Themes (Minimal & Glass) – Switch between modern themes in Admin → Settings → General/Device Settings.
-
Smoother Report Navigation – Back and close buttons now behave consistently across all reports.
🏷️ Tags System
-
Universal Tagging – Tags can now be used across multiple modules such as orders, inventory, and transactions.
-
Bulk Tag Editing – Select multiple records and edit tags in one go.
📦 Price List
-
Drag-and-Drop Reordering – Reorganize shelf or order item lists easily by dragging.
-
Price List JSON Import/Export – Export or update your price list easily via JSON files in Settings → Price List.
Go to Settings > Update to apply this update in your system.
If you experience any issues or want to learn how to use these new features, just head to your Works25 Help Center or contact support.
Update 2025-08-28
This latest update introduces a suite of significant enhancements designed to streamline workflows, improve system performance, and enrich the overall user experience. Key advancements have been made in payment processing, document management, user permissions, and interface design.
In user management, we’ve rolled out an advanced permission management system that allows staff to request temporary access without waiting for manual admin approval, streamlining the entire workflow. Admins can monitor and manage these requests through a dedicated dashboard. This is complemented by enhanced user profile controls, giving individuals more autonomy over their own information.
We have also significantly improved document and inventory management. Shelf and process management is now more intuitive with an AJAX-based system that supports drag-and-drop reordering, allowing for better organization and process tracking. For document handling, users can now print Delivery Orders (D.O.s) in bulk directly from invoices, with a convenient dropdown menu to control how pricing is displayed. Furthermore, we’ve introduced comprehensive PDF export functionality, enabling professional sharing and archiving of key documents like collection reports, sales reports, invoices, and credit notes.
On the back end, database queries have been optimized to deliver faster page loading times and a more responsive system. We’ve also implemented parameterized queries to strengthen data security. The cash register system has been enhanced to provide more detailed cash tracking, including note counts, for more accurate daily reconciliation and better cash drawer management.
Finally, we’ve polished the user interface for a more intuitive experience. This includes updating labels for clarity and improving the positioning and consistency of buttons across various pages.
Numerous bug fixes and stability improvements have also been deployed, addressing issues related to permissions, database schema, signature deletion, API error handling, and thermal printing.
In summary, these updates mark a significant evolution of the platform, delivering a faster, more secure, and user-friendly system with powerful new features for payment processing, document management, and user control.

Advanced Permission Management System
Some functions such as:
- Print Bill for unpaid orders
- Print D.O. for unpaid orders
- Edit Bill for delivered and/or paid orders
- Edit payment transactions
now can be requested for permission on the specific bill or transaction, by the staff.
In such case where the staff normally does not have authority to use such functon, the function button such as print bill will be replaced with Request To Print Bill.
Clicking the request button will send a request to authorised users. The authorised user can login into the system anywhere, and see a banner in the dashboard, to approve, deny or view the request.
On approval, the staff can only use the permission once, for the specific bill, within 24 hours.

The permission approval banner.

Print D.O. and Print Bill button are disabled, instead, replaced with request buttons.

Simalarly, for edit bill button.

Upon approval, the staff will find the approved function buttons specifically on the approved bill only.

Grant Temporary Permissions
Admin can now grant specific temporary permissions for a selected staff for a limited time.
In Users > Permissions, admin can click on the green Temporary Permissions button to start the process of selecting a user and select temporary permissions, and the time limit.

The steps include selecting a user, then select permissions to be granted, and then specify the time limit for such permissions.
Lastly, the set of permissions can also be saved as a template for similar usage in the future.

Advanced Cash Management at the Counter
Few functions are added:
- Block new order if no Cash Check was done yesterday or today.
- Specify a starting cash amount for the new business day.
To enable these functions, go to the specific counter PC or Tablet, and open the system.
Go to Settings > Device Settings.
On Preferred Payment Method, choose Payment Type to Malaysia Cash. The functions configuration inputs will appear just below it.

If the starting amount is stated, the system will notify in the daily closing report, how much cash to be taken out.

If the payment type is set to Cash or Malaysia Cash, the same report will show each note count recorded on Cash Check.

Easy PDF button
We have also included a dedicated PDF button on bills, this is easier than clicking Print and Save as PDF.

Suppliers Name with Past Purchases
Inventory Items now readily show suppliers in the past purchase list.

Transaction Advice
A transaction advice can now be produced as an acknowledgement of a transaction, with optional confirmation signature.
Access this function via Accounting > Transactions. Click on the Links icon on a transaction, and click Transaction Advice.

Bulk Print of D.O.s for generated Invoices
The D.O.s in a generated invoice can be printed in bulk with a dedicated button, in the invoice summary. No more printing D.O. 1 by 1.